It is Vacation time and I want to complete this tutorial series as soon as I can so that we can start with a new series, if possible.
In this post we will be learning how to make a split screen multiplayer (2 players to be precise) racing game where in one user controls a particular car using the keys 'W A S D' and the other user controls another car using 'I J K L'.
So what are we waiting for, 3.....2.......1........ RACE
Step 1: Duplicate the 'Car' transform by right clicking and selecting 'duplicate' option ('ctrl+d' can be used as well)
Step 2: Rename it to say, 'Car1'. Reposition this Car1 as in the image below
Step 3: Go to GameObject --> Create Other --> Camera and create a new camera
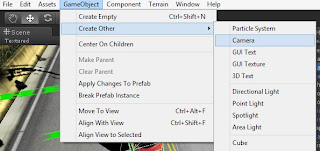
And then you should get something like this on your 'Hierarchy' section.

Step 4: Attach the 'CarCamera' script to this new camera as well. And set the 'target' to 'Car1'.

Step 5: Now we will create a javascript for this 'Car1' and name it as 'Car1' itself. Now copy the 'Car' script and paste it into this 'Car1' script.
To make the 2nd car controlled using the keys ' I J K L', find the code below in the 'Car1' script:
function GetInput()
{
throttle=Input.GetAxis("Vertical");
steer =Input.GetAxis("Horizontal");
if(throttle < 0.0)
brakeLights.SetFloat("_Intensity", Mathf.Abs(throttle));
else
brakeLights.SetFloat("_Intensity", 0.0);
CheckHandbrake();
}
Now Change the 'Vertical' to 'Vertical1' and 'Horizontal' to 'Horizontal1' and save the script. As a result you should have something like this:
function GetInput()
{
throttle=Input.GetAxis("Vertical1");
steer =Input.GetAxis("Horizontal1");
if(throttle < 0.0)
brakeLights.SetFloat("_Intensity", Mathf.Abs(throttle));
else
brakeLights.SetFloat("_Intensity", 0.0);
CheckHandbrake();
}
Finally to finish this step, replace the 'Car' script on 'Car1' with this newly created 'Car1' script and fill the blank variables in the inspector section, if any, as per requirements.
Step 6: You will come across this error, if you have done the steps correctly, which says:
"Assets/Scripts/JavaScripts/Car1.js(64,7): BCE0132: The namespace '' already contains a definition for 'Wheel'."
Now go to the 'Car1' script and 'comment' the lines of code of 'class Wheel' and you should get something like this:
/*class Wheel
{
var collider : WheelCollider;
var wheelGraphic : Transform;
var tireGraphic : Transform;
var driveWheel : boolean = false;
var steerWheel : boolean = false;
var lastSkidmark : int = -1;
var lastEmitPosition : Vector3 = Vector3.zero;
var lastEmitTime : float = Time.time;
var wheelVelo : Vector3 = Vector3.zero;
var groundSpeed : Vector3 = Vector3.zero;
}*/
Than save it to see the error being vanished.
Step 7: Now we will add the keys to control the 'Car1'.
For this, go to Edit --> Project Settings --> Input and you will see the 'Input Manager' on the 'Inspector' section. Expand the 'axes' and do the changes as in the image below (DO the changes for the 'Horizontal' and 'Vertical' after the 'window shake y'):

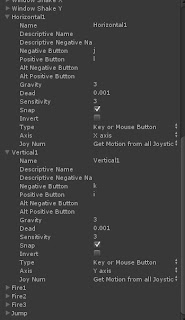
Step 8: Finally we will split the screen into two halves. To do this you need to change the 'Normalized view port rect' of both the cameras.
For the 'Main Camera' apply the values as shown in the image below:
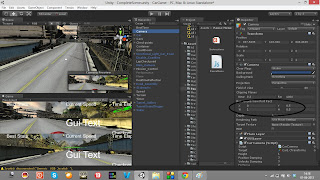
And for the 'Camera' apply the values as in the image below:
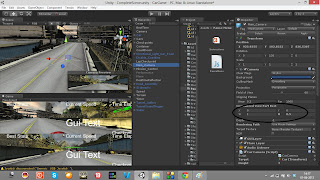
This is it. We have a split screen two player racing game. Race with your friend and have fun.
+1 it and Share it if you found this useful. And circle me, if you still have not. Also leave your comments behind.
In this post we will be learning how to make a split screen multiplayer (2 players to be precise) racing game where in one user controls a particular car using the keys 'W A S D' and the other user controls another car using 'I J K L'.
So what are we waiting for, 3.....2.......1........ RACE
Step 1: Duplicate the 'Car' transform by right clicking and selecting 'duplicate' option ('ctrl+d' can be used as well)
Step 2: Rename it to say, 'Car1'. Reposition this Car1 as in the image below
Step 3: Go to GameObject --> Create Other --> Camera and create a new camera

And then you should get something like this on your 'Hierarchy' section.
Step 4: Attach the 'CarCamera' script to this new camera as well. And set the 'target' to 'Car1'.

Step 5: Now we will create a javascript for this 'Car1' and name it as 'Car1' itself. Now copy the 'Car' script and paste it into this 'Car1' script.
To make the 2nd car controlled using the keys ' I J K L', find the code below in the 'Car1' script:
function GetInput()
{
throttle=Input.GetAxis("Vertical");
steer =Input.GetAxis("Horizontal");
if(throttle < 0.0)
brakeLights.SetFloat("_Intensity", Mathf.Abs(throttle));
else
brakeLights.SetFloat("_Intensity", 0.0);
CheckHandbrake();
}
Now Change the 'Vertical' to 'Vertical1' and 'Horizontal' to 'Horizontal1' and save the script. As a result you should have something like this:
function GetInput()
{
throttle=Input.GetAxis("Vertical1");
steer =Input.GetAxis("Horizontal1");
if(throttle < 0.0)
brakeLights.SetFloat("_Intensity", Mathf.Abs(throttle));
else
brakeLights.SetFloat("_Intensity", 0.0);
CheckHandbrake();
}
Finally to finish this step, replace the 'Car' script on 'Car1' with this newly created 'Car1' script and fill the blank variables in the inspector section, if any, as per requirements.
Step 6: You will come across this error, if you have done the steps correctly, which says:
"Assets/Scripts/JavaScripts/Car1.js(64,7): BCE0132: The namespace '' already contains a definition for 'Wheel'."
Now go to the 'Car1' script and 'comment' the lines of code of 'class Wheel' and you should get something like this:
/*class Wheel
{
var collider : WheelCollider;
var wheelGraphic : Transform;
var tireGraphic : Transform;
var driveWheel : boolean = false;
var steerWheel : boolean = false;
var lastSkidmark : int = -1;
var lastEmitPosition : Vector3 = Vector3.zero;
var lastEmitTime : float = Time.time;
var wheelVelo : Vector3 = Vector3.zero;
var groundSpeed : Vector3 = Vector3.zero;
}*/
Than save it to see the error being vanished.
Step 7: Now we will add the keys to control the 'Car1'.
For this, go to Edit --> Project Settings --> Input and you will see the 'Input Manager' on the 'Inspector' section. Expand the 'axes' and do the changes as in the image below (DO the changes for the 'Horizontal' and 'Vertical' after the 'window shake y'):


Step 8: Finally we will split the screen into two halves. To do this you need to change the 'Normalized view port rect' of both the cameras.
For the 'Main Camera' apply the values as shown in the image below:

And for the 'Camera' apply the values as in the image below:

This is it. We have a split screen two player racing game. Race with your friend and have fun.
+1 it and Share it if you found this useful. And circle me, if you still have not. Also leave your comments behind.


